Hamstring squeeze. Use the machine that works your hamstrings; you will either lie on your stomach or sit with a pad behind your knee. Push against the pad, moving your knee up toward the ceiling or backward (depending on which position you’re in). “In other words, bend your knees,” Pariser says. But to avoid cramps in your hamstring muscles, don’t bend your knee so much that your heels are too close to your buttocks. 
The materials and information provided in this presentation, document and/or any other communication (“Communication”) from Onnit Labs, Inc. or any related entity or person (collectively “Onnit”) are strictly for informational purposes only and are not intended for use as diagnosis, prevention or treatment of a health problem or as a substitute for consulting a qualified medical professional. Some of the concepts presented herein may be theoretical.

Health Tools Baby Due Date CalculatorBasal Metabolic Rate CalculatorBody Mass Index (BMI) CalculatorCalories Burned CalculatorChild Energy Requirements CalculatorDaily Calcium Requirements CalculatorDaily Fibre Requirements CalculatorIdeal Weight CalculatorInfectious Diseases Exclusion Periods ToolOvulation CalculatorSmoking Cost CalculatorTarget Heart Rate CalculatorWaist-to-hip Ratio Calculator Risk Tests Depression Self-AssessmentErectile Dysfunction ToolMacular Degeneration ToolOsteoporosis Risk TestProstate Symptoms Self-Assessment
Discography may be used when other diagnostic procedures fail to identify the cause of pain. This procedure involves the injection of a contrast dye into a spinal disc thought to be causing low back pain. The fluid’s pressure in the disc will reproduce the person’s symptoms if the disc is the cause. The dye helps to show the damaged areas on CT scans taken following the injection. Discography may provide useful information in cases where people are considering lumbar surgery or when their pain has not responded to conventional treatments.

The information provided herein should not be used during any medical emergency or for the diagnosis or treatment of any medical condition. A licensed physician should be consulted for diagnosis and treatment of any and all medical conditions. Call 911 for all medical emergencies. Links to other sites are provided for information only -- they do not constitute endorsements of those other sites. Copyright 1997-2019, A.D.A.M., Inc. Duplication for commercial use must be authorized in writing by ADAM Health Solutions.
Bony encroachment: Any condition that results in movement or growth of the vertebrae of the lumbar spine can limit the space (encroachment) for the adjacent spinal cord and nerves. Causes of bony encroachment of the spinal nerves include foraminal narrowing (narrowing of the portal through which the spinal nerve passes from the spinal column, out of the spinal canal to the body, commonly as a result of arthritis), spondylolisthesis (slippage of one vertebra relative to another), and spinal stenosis (compression of the nerve roots or spinal cord by bony spurs or other soft tissues in the spinal canal). Spinal-nerve compression in these conditions can lead to sciatica pain that radiates down the lower extremities. Spinal stenosis can cause lower-extremity pains that worsen with walking and are relieved by resting (mimicking the pains of poor circulation). Treatment of these afflictions varies, depending on their severity, and ranges from rest and exercises to epidural cortisone injections and surgical decompression by removing the bone that is compressing the nervous tissue.
In the elderly, atherosclerosis can cause weakening of the wall of the large arterial blood vessel (aorta) in the abdomen. This weakening can lead to a bulging (aneurysm) of the aorta wall. While most aneurysms cause no symptoms, some cause a pulsating low back pain. Aneurysms of certain size, especially when enlarging over time, can require surgical repair with a grafting procedure to repair the abnormal portion of the artery.
Deanna is an ACE® certified personal trainer, Balanced Body® Pilates instructor, and NASM® Fitness Nutrition Specialist. She is passionate about inspiring others to lead a healthier lifestyle through fun workouts and healthy food. When she’s not creating new workouts and recipes for her blog The Live Fit Girls she enjoys running with her two dogs and traveling.

This Web site provides general educational information on health-related issues and provides access to health-related resources for the convenience of our users. This site and its health-related information and resources are not a substitute for professional medical advice or for the care that patients receive from their physicians or other health care providers.

Place a mini band around your ankles and spread your feet about shoulder-width apart. Keeping your legs relatively straight (you want the motion to come from your hips) and toes pointing forward, walk forward 10 steps, then backward 10 steps. Take a short break and then walk to the right 10 steps, then to the left 10 steps. Again, focus on keeping your legs straight and toes pointing forward.
Without changing the position of your knees, bend at your hips and lower your torso until it’s almost parallel to the floor (or as far as you can comfortably go without rounding your back). Pause, then lift your torso back to the starting position. Be sure to squeeze your glutes and push your hips forward to lift your torso back to the starting position. This ensures you’re engaging your hip muscles instead of relying on your lower back. Do 10 reps total.
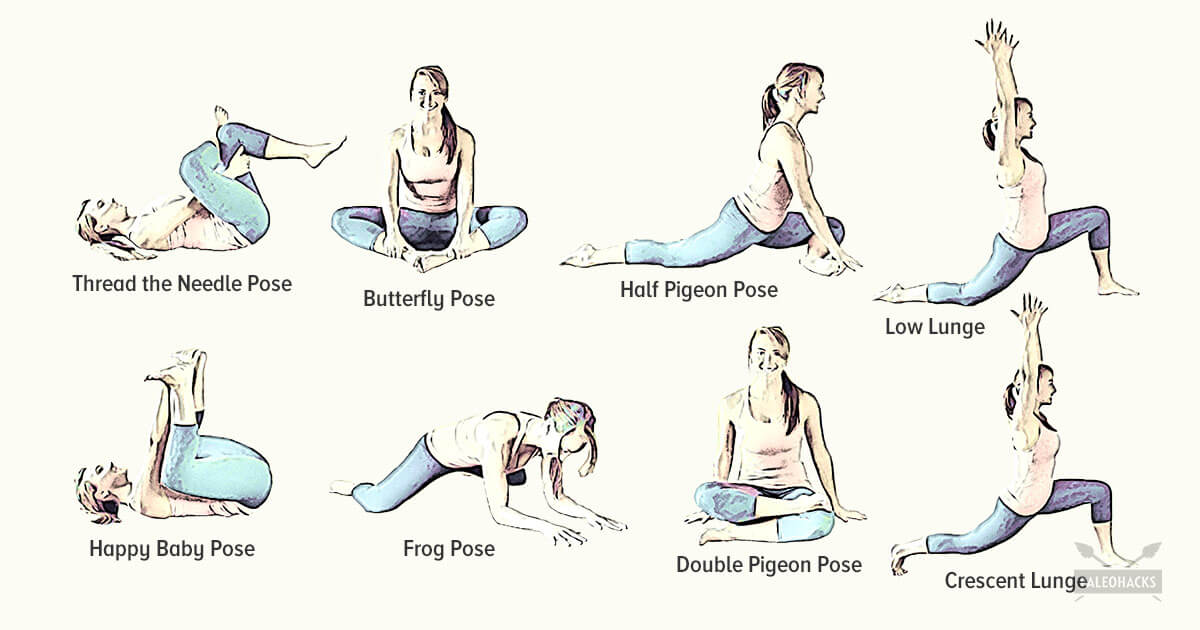
Keeping your hips mobile is important for overall hip function and athletic performance. Mobility refers to the ability of your joints to move through a pain-free, unrestricted range of motion. For cyclists, hip mobility is critical since pedaling occurs in one plane of motion, and after miles and miles in the saddle, hip tightness and restriction may develop. The following movements will help with hip mobility.
The hip flexors play an important role in everyday mobility and exercise. Involved in pulling the knee toward the hip, most movements either directly or indirectly use the hip flexors. That’s why even the slightest injury can cause great discomfort. Learn how you can recover from a hip flexor injury, and what precautions can be taken to avoid them.
Doing the bridge exercise in the morning gets your muscles working, activated, and engaged and will help support you the rest of the day, says Humphrey. Lie on your back with your legs bent and your feet flat on the floor, hip-width apart. Press down through your ankles and raise your buttocks off the floor while you tighten your abdominal muscles. Keep your knees aligned with your ankles and aim for a straight line from knees to shoulders, being sure not to arch your back; hold this position for three to five seconds and then slowly lower your buttocks back to the floor. Start with one set of 10 and build up to two or three sets.
NINDS health-related material is provided for information purposes only and does not necessarily represent endorsement by or an official position of the National Institute of Neurological Disorders and Stroke or any other Federal agency. Advice on the treatment or care of an individual patient should be obtained through consultation with a physician who has examined that patient or is familiar with that patient's medical history.
Start kneeling on your mat with knees hip-width apart and hips directly over knees. Press your shins and the tops of your feet into the mat. Bring your hands to your low back, fingers pointing down, and rest palms above glutes. Inhale and lift your chest, and then slowly start to lean your torso back. From here, bring your right hand to rest on your right heel and then your left hand to your left heel. (If you can't reach your heels, turn your toes under; it will be easier to reach your heels in this modification.) Press your thighs forward so they are perpendicular to the floor. Keep your head in a relatively neutral position or, if it doesn't strain your neck, drop it back. Hold for 30 seconds. To come out of the pose, bring your hands to your hips and slowly, leading with your chest, lift your torso as you press the thighs down toward the floor.